0%

1 背景

最近半年做了一次大的业务架构重构,总体涉及 2w 多行代码,整个弄完以后个人对客户端架构侧的基本概念又有了一些新的理解。

2 问题

模块功能大概是类似音视频上下滑列表,整体有两大块,上下滑容器详情页。页面结构如上图(示意图)所示。

fgwGFS.md.png

原始的框架核心类如上图所示:

  1. 上下滑容器类,各种跟上下滑相关的逻辑都放在这个视图控制器中,业务方继承上下滑容器类,则他拥有上下滑能力,并且可以通过该业务子类重写父类里面的方法,来达到业务逻辑的定制;
  2. 详情页接口类,是一个纯接口。业务方通过实现该接口里面的各种方法把详情页融入上下滑框架;
  3. 接口回调是一个代理接口类,主要用于返回详情页事件,让容器感知各种详情页事件,执行对应操作。

经过长期业务迭代,发现上下滑容器类耦合严重,究其原因主要是两方面:

  1. 附加功能和基本功能堆叠,即上下滑容器职责不单一,整个代码接近 2k 行,包含滑动,刷新,触底,网络监控,快速起播,缓存等等许多逻辑。这直接导致我们添加、删除、修改上面的业务逻辑非常不方便。
  2. 上下滑容器承载了详情页的业务逻辑,即上下滑容器里面直接关联了详情页,详情页和上下滑容器通过详情页回调通信。这样使得上下滑容器里面的业务层和功能层耦合了,因为上下滑容器既要实现功能层的滑动框架等基本功能,也需要关注详情页的个性化事件进行对应处理。

3 附加功能和基本功能堆叠的解法——模块、插件与服务

3.1 经典做法——分类

针对附加功能和基本功能堆叠这个问题,我们有一个经典做法——分类。把上下滑容器页按照功能拆分为主类和分类。就我们这个上下文来说,上下滑承接这种逻辑可能在主类里面,其他诸如缓存逻辑、预加载逻辑、刷新控制逻辑等都可以独立为分类。这种做法的好处就是简单清晰。不过此方案至少存在两个缺陷:

  1. 如果业务方想删除某个附加逻辑,则仍然需要继承整个页面容器后覆盖一个个分类函数,后续调试维护不是很方便;
  2. 如果业务方想新增独立的附加逻辑,首先是需要建立一个业务侧分类,然后需要在主类里面导入这个新的业务分类,并在合适的时机调用这些分类方法。这里就存在主类对业务方分类的反向依赖。

    3.2 聚合关联业务逻辑——模块化

经典方案的缺陷本质是分类依赖了主类的时机和数据。比如,就预加载分类来说,主类在视图生命周期和上下滑切换这两个时机需要调用预加载分类的预加载方法。针对这个问题,我们可以使用观察者模式,即把主类当做主题,抛出时机和数据,分类作为观察者接受时机和数据执行动作,以此解耦。更进一步,观察者可以不用是一个分类,只要是一个简单的对象类就可以。我们暂且把这个类称为模块类,它聚合了一块独立的业务逻辑,感知容器类的事件和数据执行具体的动作。

fgw1df.png

3.3 标准化输入输出——插件化

标准化容器类的数据和事件,比如提供统一的生命周期,上下滑,网络,展示等事件。同时,附加模块对外提供统一的 API 接口。再加上附加模块本身就是观察者,天然可插拔。这样一个模块就相当于上下滑主题的插件。

fgw3o8.png

3.4 依赖接口不依赖实现——服务化

针对某些场景,业务方需要整体重写某个插件,比如要重写预加载插件。如果我们在框架的其他类里面直接依赖了具体的预加载插件类,则这件事变得很艰难。比较优雅的做法是预加载抽出一个接口,插件类实现该接口。其他地方通过服务发现访问插件接口而不是直接调用某个具体的插件类。同时插件接口通常比较简单,方便下沉分层。这个思路其实是借鉴组件分层,组件接口下沉,接口库和实现库分层。

fgwleP.png

4 容器承载详情页业务逻辑的解法——功能层与业务层分离

fgwJJg.md.png

4.1 问题的分析

另外一个问题是上下滑容器承载了独特详情页的逻辑,即原始的框架是上下滑容器里面直接关联了详情页,详情页通过回调告知上下滑容器自己发生的事件,上下滑容器收到对应事件后执行调用。这样使得上下滑容器里面的业务层和功能层耦合了,因为上下滑容器既要实现功能层的滑动框架等基本功能,也需要关注详情页的个性化事件进行对应处理。

4.2 来自 IGList 的启发——功能层和业务层分离

针对这个问题,我们可以直接借鉴 IGList 的思想,IGList 中每个详情页被 SectionController 管理起来了,框架只感知 SectionController,不感知详情页。因此,新上下滑容器不是直接访问详情页,而是中间有一层业务层 ViewItem。ViewItem 组合一个详情页并且接受对应的事件回调。接到事件回调后,可以调用功能层的各种插件服务。这样使得上下滑容器变成一个纯粹的功能层,不再感知具体业务。综上,上下滑容器变成纯粹的功能类,业务这部分由 ViewItem 承接起来了,因为是 ViewItem 感知了详情页事件并进行逻辑判断后调用上下滑容器的基础功能去执行。具体如上图所示。

5 总结

本次记录了一次业务架构重构的技术侧构思,原来对一些架构名词的认知还是停留在纸面,经过此次实践理解更加深刻了。

1 背景

同快手App一样,快手极速版App也会参加2020央视春晚活动,考虑到春晚活动时产品DAU会突增,有大量的网络请求从客户端发出,容易打死服务端,导致客户端界面展示异常,核心功能不可用,春节活动无法顺利开展等。因此通过对客户端API网络请求进行精细化控制减少对服务端的压力,保障核心功能和春节活动变得非常重要。

2 关键问题

整个App稳定性保障客户端侧的关键问题大致有三个:

  1. 任务相关:具体实施哪些行为来控制API请求;
  2. 组织相关:整件事情涉及的人数广团队多,包括基础团队和各个业务团队,整个几百人,如何推进保证最终达成目标;
  3. 效率相关:在任务实施的过程中,如何保障质量效率。

3 任务相关

具体实施哪些行为来控制API请求呢?我们认为大致有两件事要做:

  1. 设计并用代码实现一套行之有效的稳定性策略来限制不必要的请求以及保障真正重要的请求
  2. 确保这套策略确实能达到效果且对App核心数据无明显负向

3.1 策略

经过讨论,我们决定使用一套json来同时下发稳定性策略和春晚活动策略,这样只要保证这套json能正确触达用户,整个春晚活动就能玩得转。同时这套策略也必须要保障能正确触达用户,不然后面的事情就无法玩转。

3.1.1 实时高可用

首先需要保障策略高可用,在路径侧我们大概做了四层,第一层是从接口下拉的策略配置,第二层是从CDN下拉的策略配置,第三层是本地缓存的上次成功从接口获取的配置,第四层是客户端本地兜底配置,每个策略自带版本号,高版本可覆盖低版本,反之则不行。同时在实时触达方面,我们大概做了两件事,首先每次冷启动需要拉取策略,其次通过APP的心跳接口给客户端下达最新版本号,客户端对比本地版本号和网络号后决定是否获取最新策略。

3.1.2 API限流

针对一些运营类接口比如用户引导弹窗配置接口或者是App体验优化类的接口比如启动直接获取魔法表情列表,离线包配置信息,这些接口可以做限流。具体是把App的生命周期划分为几个关键的时机,改造业务请求带上请求时机标记,则API限流策略可以通过配置使得指定API在部分时机内不发出请求,直接返回。可能的关键时机包括:冷启动、首页创建、切换前台、切换后台、登录、登出、获取到AB、网络状态改变、默认等等。
例如:

1
2
3
4
5
6
7
8
9
10
11
12
13
14
15
16
17
"api_degrade": [
{
"paths": [
"/operation/foo",
"/optimize/foo"
],
"time": [
"cold_start",
"homepage_create",
"foreground",
"background",
"login",
"logout",
"after_ab"
]
}
]

3.1.3 API延迟打散

一些客户端日志上报请求会定时上报日志,如果这些请求被限流,则在限流时间内日志会堆积在本地,一旦API限流放开限制,则这些高频的定时上报日志请求会在短时间内把大量堆积在本地的日志发送到服务端,首先这些日志的上行流量比较大,其次这些日志几乎会在放开限制的同时向服务端发送请求,造成服务端高峰值。为了削峰,我们做了API的延迟打散,即把请求延迟到一个随机时间后再发送。
例如:

1
2
3
4
5
6
7
8
9
10
11
12
13
14
15
16
"api_delay_and_rand": [
{
"feature": [
"push"
],
"delay_time": 10000,
"rand_time": 10000
},
{
"feature": [
"client_log"
],
"delay_time": 10000,
"rand_time": 120000
}
]

3.1.4 API最小请求间隔

部分请求可能在切换前后台时发送或者有本地轮询,如果一旦频繁切换前后台或者轮询频率过高,则依然有可能把服务端打垮。因此我们做了一套兜底的策略,即限制每个请求的最小请求间隔。

1
2
3
4
5
6
7
8
9
10
11
12
13
14
15
16
17
"api_min_request_interval": [
{
"paths": [
"/foreground/foo"
],
"time": 30000,
"ignore_time": [
"default"
]
},
{
"paths": [
"/roll/foo",
],
"time": 60000
}
]

3.1.5 API转CDN

针对一些核心的基础功能接口,比如发现,同城,热门或者是一些春节活动相关核心接口,需要强化保护策略。具体是采用CDN兜底,如果API请求失败,则拉取CDN数据,或者甚至可以不请求API直接请求CDN,当然这是针对API大规模不可用的一种预案。
例如:

1
2
3
4
5
6
7
8
9
10
11
12
13
14
15
16
17
18
19
20
"api_to_cdn": [
{
"path": "/infra/foo",
"cdns": [
"a1.static.com",
"a2.static.com"
],
"cdn_path": "/{cdn}/degradation/infra/foo.json",
"use_api_first": true
},
{
"path": "/spring_festival/foo",
"cdns": [
"a1.static.com",
"a2.static.com"
],
"cdn_path": "/{cdn}/degradation/spring_festival/foo.json",
"use_api_first": true
}
]

3.2 验证

做好策略后,我们需要验证策略的效果。要确保这些稳定性策略确实生效,并且对App核心数据没有明显负向。

3.2.1 本地测试

策略的本地测试主要通过网络代理来监听客户端的API请求情况,判断具体场景下的限流是否生效,或者API请求是否转换为CDN请求等。同时端上在一些代码核心节点,比如策略被更新、某个API命中了某个具体策略,等等打上端日志来辅助QA判断或者研发定位问题。

3.2.2 线上演练

降级演练也是必须操作,通过演练来验证降级效果发现降级中的问题。我们进行了2次大的演练,元旦,小年,还有一些常规的演练。大致发现了有些API降级不生效、降级恢复后峰值过高等问题。

3.3.2 AB实验

我们预先选择了一系列的运营类、性能优化类、以及部分功能类的API接口作为降级备选对象,按照预估的影响范围有梯度的做好三套配置。把这三套配置接入到实验平台,加上base组一共四组进行对照,大致判断降级后对App核心数据的影响,比如播放时长,新增次留等等。最终选出两组配置。

4 组织相关

不管是策略的实现还是验证以及最终上线都需要人来做。春晚API稳定性保障这件事显然不是一个人能搞定的,那是怎么划分任务,做到人事匹配,顺利落地呢?

4.1 职责划分

大略分为两类人,一类是owner团队,对整个事情的最终落地负责。主要包括服务端,客户端和QA,负责讨论策略,开发代码,组织各种策略验证以及上线策略等等。另外一类是配合团队,来自各业务线,负责配合把这个事情落地到各业务线,他们大多数是来自业务线团队的资深工程师或技术负责人,做的事情主要是向owner团队提供必要信息,比如梳理某个API的上下行流量,是否可以在启动时屏蔽某API等等。

4.2 流畅协作

跨团队参与的项目,必定存在很多信息不对称的问题,简单信息群聊或者线下单对,重要信息通过开会来同步。整个项目大致有如下几种会议。

  1. 日例会,与会人员多是owner团队内部成员,会议集中在策略设计、研发和本地测试期间,基本是在讨论设计缺陷、研发bug的解决情况等等。更多是一种决策性的会议,群策群力来解决策略落地的各种技术问题。比如,刚开始设计的协议可能比较冗余,会占用较多的下行带宽,在每日会议中提出了新的设计等等。
  2. 复盘会,每次演练都会发现问题,这种问题会梳理出来,然后分发给业务线,业务线派代表来参会,主要是定位问题产生的原因并提出解决方案。比如,某些业务侧API降级不生效,某些API在降级完成后,立刻出现尖峰等等。
  3. 布道会,布道会的主要目标是让相关人员学习特定的知识或技能,比如内部新开发的策略修改上线工具如何操作,这些需要业务线和owner团队的成员都要会用。
  4. 协调会,这种会议的主要作用是确立共同的目标和行动方针,达到认识和行动的协调一致,比如告知大家xx号会进行演练,演练的大致时间和流程安排,需要参加的人员等等。

5 工具链建设

除了任务本身很重要以外,还有一块是给任务提效的工具的建设,保障项目落地的质量与效率。

5.1 策略修改上线

策略修改上线有几个难点:

  1. 策略本身是一个很复杂的json,涉及的字段有几百个;
  2. 里面的有些字段是特定格式,比如跟时间挂钩,还有些字段是enum,只有特定的几个有意义的值;
  3. 策略上线之前还有diff配置,以及review的需求,不能简单直接上线。

为了解决以上痛点 ,我们做了一个系统工具来简化策略的配置与上线流程,目标是避免格式出错,且标准化上线流程,大致操作是界面化输入,不用直接操作json,自动diff配置发送给reviewer,reviewer确认才能上线。

5.2 代码同步优化

快手App和快手极速版App是两拨人在维护,参与到owner团队的也是两拨人。主要的代码实现由快手App的同学完成,极速版App的同学更多的时间在做代码同步以及功能可用性验证的工作。因此实时监听快手App的代码变更变的很重要。我们专门做了个gitlab hook,监听快手App的基础库升级情况,发现指定同学的升级会推送一条消息到快手极速版的群里,实时查看代码判断是否跟春节稳定性相关。

6 总结

图片

2020春节已过,快手极速版春节客户端稳定性保障项目也最终成功上线。很幸运能有机会参与到这样一个有纪念意义的项目,事后反思推一个技术项目的方法好像也就大概这三部曲,任务分拆,人事匹配,提质提效。

1 背景

在日常开发中,我们经常会碰到一类具有如下特征的需求。一,业务复杂,动辄开发70 ~ 80人日(客户端30 ~ 40,服务端30 ~ 40) 。二,周期短,PM要求下个版本或者下下个版本必须上线,通常一个迭代给客户端开发就12 ~ 13天左右。三,多人参与,基于前两个特征,客户端要在指定时间内完成指定需求,必须要多个人参与项目。如果客户端不具备复杂、短周期、多人项目工程化能力,让项目delay或者加班堆人日解决问题,就会成为业务发展的瓶颈,备受各方吐槽。

2 原因分析

这里我们仅讨论项目迭代中的开发阶段。先分析一下大需求delay或者加班堆人日的原因。我认为原因大致有两点。一、缺乏有效估时;二、缺乏有效监督与纠偏

2.1 缺乏有效估时

  1. 需求点把握不足,进行拆解估时时候,经验不足的同学偏乐观,凭借自己对相关业务需求的大致理解估时,很容易需求点把握不足,从而估时不足。
  2. 缺乏架构设计,在项目开始的时候,缺乏整体架构设计,整体认知不足,不能高屋建瓴。
  3. 缺乏核心流程分析,对需求的核心流程没有画出流程图,很容易出现后期编码流程跑不通。
  4. 估时没有考虑到人员交流成本,估计时间的时候要考虑到交流沟通的时间耗散。

2.2 缺乏有效监督与纠偏

  1. 没有里程碑或者里程碑过于简略,完全没有里程碑几乎必然导致项目的延期,一个合理的里程碑,简单来说就是什么时间做什么事达到什么效果。
  2. 进度滞后不能预警和纠偏,没有全方位跟踪项目进度,进行进度滞后预警,以及安排项目纠偏。

3 针对性措施

3.1 有效估时

3.1.1 需求点把握

  1. 逐行校对需求文档、交互稿、设计稿、API文档,确保不会遗漏需求点。
  2. 理解需求,对需求的理解跟其他业务合作方要一致,如跟PM和API一致等。
  3. 吃透需求,把需求点跟对应代码上下文进行映射。

3.1.2 架构设计

业务需求架构设计,大致分为两个部分,界面和业务。界面又包括偏交互和偏视觉。业务也能进行具体的模块拆分。架构的时候要进行合理的模块细分,充分暴露大方向上的问题。

3.1.3 核心流程图

核心流程至少要涉及API的调用时机和页面跳转以及页面刷新等。

3.1.4 合理人员划分减少沟通成本

偏界面和偏业务都要有一个整体负责人,尽量不要产生跨细分模块的交流。

3.2 监督与纠偏

3.2.1 合理的里程碑

合理的里程碑设置时间点考虑因素大致有两点。一、API可用性,即API提测时间,提测bug率等。二、QA用例可用性。里程碑不要缺乏必要信息,要可以度量,简单来说就是什么时间什么事怎么算做成了。一种有效的方式是基于Case来评判。

3.2.2 进度监控预警与纠偏

当发生不预期事件,导致估计时间与时间所用时间产生偏差时,要及时预警与纠偏。常见的不预期事件有两类,第一是编码过程中踩坑,第二是跟PM需求点理解不一致。出现这些事件首先要跟其他业务方沟通,看看能不能规避。如果不能规避,看看是否在对应里程碑能Cover住,不能Cover住要及时调整里程碑。

4 总结

本文从实际出发分析了复杂、短周期、多人项目在项目迭代中的开发阶段产生delay或者加班的原因,并总结了一些可行的针对性措施,希望能提高生产率,降低风险,尽量减少不必要的加班。

1 引言

据不完全统计,自12年参加实习到14年正式工作以及15年10月来到美团,我大小参加过约80场面试,其中约20场是以面试官的身份进行。下面分享一下我作为面试官的一些思考与总结。

2 基础知识

2.1 相关定义

一般来说,在接触到一个新事物的时候,我们总习惯先对相关理论知识进行学习。比如,最基本的,要了解面试、面试者和面试官的定义,以及三者的关系。相关细节我们不展开,可以直接Google。

2.2 面试流程

按照时间先后顺序,面试大约有如下环节。首先,流程发起,即上级或者HR发起流程告诉你于X时间,Y地点,面试Z人,跟记叙文三要素一样,通常此时你会看到该面试者的简历。其次,面试前准备,面试前准备主要是针对面试者的简历,找出一些你感兴趣的地方,根据这些兴趣点预先想好一些问题并记录下来,作为面试过程中的参考问题。再次,面试过程,即面试官跟面试者问答的过程,此时需要简要记录问答过程,并有理有据的做出合理判断。最后,结论输出,根据面试过程中面试者对相关问题的回答来确认该面试者是否通过面试并邮件周知相关人员(附上面试记录)。

3 一些考察点

3.1 流程熟悉度

流程熟悉度类问题适用于有一定工作年限或者是有项目管理经验的面试者。基础能力模型是熟悉项目迭代流程,如需求,排期,开发,测试,灰度,上线等。判断一个面试者是否真正参与过这些流程有一个比较简单的方式,就看他使用的工具。比如,在排期阶段我们使用的工具比较简单就是wiki文档+日历+jira。专业一点的团队可能会使用OmniPlan。再比如,开发中他们使用git吗?是gitflow来协作的吗?对CI是否了解,知道CI系统的组成元素吗?TestCase是通过专业系统给出的吗,还仅仅是word文档?对后台日志系统是否熟悉?鉴于这些东西我也只是粗浅了解,就不过多展开。

3.2 业务理解

业务理解度问题适用于每个业务开发者。他是否对自己所做的业务熟悉,能屡清楚业务流程吗?知道业务都有哪些坑吗?针对这种坑有采取措施吗?他的这些措施是否会产生副作用?他自己清楚副作用吗?几乎没有完美的方案,有的只是适合当前业务的方案。举个例子,某次一个做打车软件的面试者,说他针对订单状态机紊乱的问题做了状态机切换的客户端校验。这种手段当然能解决状态机紊乱,但是可能带来的副作用就是客户端强感知业务状态变化固化业务逻辑。面试者对具体方案的细节点处理是否了解。再举一个例子,有一次一个面试者说他参与设计了一套换肤系统。恰好我也做过类似模块。那么他对资源包格式,断点下载,并发下载,下载进度交互,下载解压失败处理,这些东西是否真正了解。询问对方领域技术模型,比如打车电商这些APP,一般都会涉及状态机模型。工具类App,可能会涉及网络资源配置模型。资讯类App,一般会涉及缓存模型。他在模型描述过程中的理由是否充分成为业务理解度的重要指标。

3.3 知识储备

基础知识这个一般问的也比较多,基本就是分两大块,iOS相关和CS基础,这种问题基本网上都有相关资料,这里也不过多展开。一般就是看谁的储备多。

3.4 通用技术

经常有面试者在简历上写他参与团队的Code Review,那么他经常Review出哪些问题呢?针对这些问题,他是否有总结,形成规范,达成一致,方便后来人。还有一些同学在简历上写他进行崩溃的处理,那么他是否有对crash类型,crash日志格式,常见的crash有总结,是否规约化了。还有就是性能优化,基本的套路是问题发现,原理调研,业界方案,方案选择,效果验证, 规约化,工具化。然后就是二次封装,经常会有开发者在简历上写熟悉XX开源库的原理,那么他是否参与过开源库的二次封装呢?比如网络库,通参添加,GET网络请求去重,服务器宕机处理,这些点是怎么搞的。SDWebImage,图片尺寸参数什么,失败retry什么的怎么做的?这些点都能体现水平。

4 后记

这篇博文是17年5月为团队培养新面试官所作,距今半年有余。这半年随着个人眼界和水平的提升,对面试这件事又有些新的认识。比如文中尚未提及问题解决能力,这个点这里也不详谈,之后的面试中会重点关注。

1 前言

WebViewJavascriptBridge是iOS/OSX平台上支撑Obj-C和UIWebViews/WebViews JavaScript互发消息的库。目前主流App几乎都是某种程度的Hybrid App,该库因而得到广泛应用。

2 基础知识

在学习该库之前我们必须了解一些基础知识。主要包含前端和Native两大部分。

2.1 前端部分——HTML

Keypoint:

  • <script> 标签包裹的是JavaScript代码
  • window、iframe
  • setTimeout(0)

2.2 前端部分——JavaScript

Keypoint:

  • JavaScript函数、对象

资料:

2.3 Native部分-关于UIWebView

1
2
3
4
5
6
7
8
9
__TVOS_PROHIBITED @protocol UIWebViewDelegate <NSObject>

@optional
- (BOOL)webView:(UIWebView *)webView shouldStartLoadWithRequest:(NSURLRequest *)request navigationType:(UIWebViewNavigationType)navigationType;
- (void)webViewDidStartLoad:(UIWebView *)webView;
- (void)webViewDidFinishLoad:(UIWebView *)webView;
- (void)webView:(UIWebView *)webView didFailLoadWithError:(NSError *)error;

@end

UIWebView的代理UIWebViewDelegate,会在UIWebView各个事件节点收到回调消息。其中最重要的是- (BOOL)webView:(UIWebView *)webView shouldStartLoadWithRequest:(NSURLRequest *)request navigationType:(UIWebViewNavigationType)navigationType

当UIWebView加载URL page或者iframe设置src的时候,UIWebViewDelegate都会执行该回调。

3 WebViewJavascriptBridge设计

在分析WebViewJavascriptBridge源码之前,我们先聊一下WebViewJavascriptBridge设计。

3.1 整体框架

图片

WebViewJavascriptBridge整体框架如上图所示。

包含4部分:

  • 前端业务逻辑
  • 前端js bridge基础设施
  • Native js bridge基础设施
  • Native业务逻辑

3.2 js bridge基础设施

总的来说js bridge基础设施主要由3部分组成:

  1. 消息流: FE和Native之间的消息传递过程;
  2. 消息体(message):message即Native和前端消息流中的消息体,主要有4个部分:函数名、参数、回调ID、响应ID;
  3. 消息队列(FE message queue):前端消息队列用来暂存前端到Native的消息体。

3.2.1 消息流

消息流如下图所示。

图片

从图中我们可以看出消息流有两个参与者,即调用方被调方调用方发起请求,收到对方的回调消息。被调方收到请求,执行请求,发送回调消息。Native和FE都可能是调用方和被调用方,所以Native和FE都至少包含两部分功能:

  • send(发送自己的调用请求到对端)
  • receive(收到了来自对端的调用请求)

3.2.2 消息体

消息体有四个成员:

  1. 函数名
  2. 参数
  3. callbackID
  4. responseID

其中函数名和参数都很好理解。这里我们主要说一下callbackID和responseID。

调用方在发起调用的同时设置回调块,该回调块在被调方执行完任务后再执行。具体的实现手段是,调用方在拼接消息体的时候,把回调块管理起来,并设置一个唯一的ID, 放到消息体的callbackID上面。 此时被调方收到的消息包含callbackID,在执行完成对应函数后,会生成一个应答消息,告知对方自己已经执行完成,这个应答消息也是一个消息体,该消息体的responseID设置为其所应答消息的callbackID,表示对该消息的应答。这时,调用方收到应答消息,检查responseID,匹配后找到之前对应的回调块并执行。

样例如图所示:
图片

4 WebViewJavascriptBridge实现

4.1 消息流和消息队列实现

消息流(前端到Native)

前端到Native的消息流由隐藏的iframe发起。每次调用js bridge函数时设置iframe的src,然后,Native的UIWebViewDelegate收到- (BOOL)webView:(UIWebView *)webView shouldStartLoadWithRequest:(NSURLRequest *)request navigationType:(UIWebViewNavigationType)navigationType回调,在回调上加一些额外的逻辑区分,Native就知道前端发起了js bridge函数调用。

消息流(Native到前端)

Native到前端的消息流比较简单。它是由UIWebView本身完成。UIWebView的- (nullable NSString *)stringByEvaluatingJavaScriptFromString:(NSString *)script可以直接执行js命令。Native要调用前端的方法时,可以把方法转化为js命令直接调用。

消息队列(FE message queue)

前端消息队列用来暂存前端到Native的消息体。
相关的点如下:

  • 前端设置iframe的src之前会先把消息存到消息队列;
  • Native收到回调后,调用相关js命令从前端获取消息队列,得到消息队列后,按照消息队列的每条消息执行相应操作——函数调用。

4.2 前端js bridge源码

4.2.1 send

参考前端到Native消息流。send通过iframe设置src和messageQueue缓存消息体实现。

1
2
3
4
5
6
7
8
9
10
11
12
13
14
15
16
17
18
19
20
21
22
23
24
// 前端调用Native
function callHandler(handlerName, data, responseCallback) {
if (arguments.length == 2 && typeof data == 'function') {
responseCallback = data;
data = null;
}

var message = { handlerName:handlerName, data:data };
if (responseCallback) { // 回调管理
var callbackId = 'cb_'+(uniqueId++)+'_'+new Date().getTime();
responseCallbacks[callbackId] = responseCallback;
message['callbackId'] = callbackId;
}
sendMessageQueue.push(message);
messagingIframe.src = 'wvjbscheme://__WVJB_QUEUE_MESSAGE__';
}

// 获取并清空message queue,暴露给OC
function _fetchQueue() {
var messageQueueString = JSON.stringify(sendMessageQueue);
sendMessageQueue = [];
return messageQueueString;
}

4.2.2 receive

参考Native到前端的消息流。receive通过registerHandler注册js bridge函数,通过_handleMessageFromObjC方法执行messageHandlers里面的函数体。

1
2
3
4
5
// 前端注册js bridge方法供OC调用,比OC直接调用js普通方法好在对回调的支持上面。
var messageHandlers = {};
function registerHandler(handlerName, handler) {
messageHandlers[handlerName] = handler;
}
1
2
3
4
5
6
7
8
9
10
11
12
13
14
15
16
17
18
19
20
21
22
23
24
25
26
27
28
29
30
31
32
// OC调用处理,暴露给OC
function _handleMessageFromObjC(messageJSON) {
var message = JSON.parse(messageJSON);
var messageHandler;
var responseCallback;

if (message.responseId) { // 回调管理(responseId匹配查找)=> message有responseId表示是一个回调调用
responseCallback = responseCallbacks[message.responseId]; // 这个responseId必须要与当时消息寄送时所填写的responseId一致
if (!responseCallback) {
return;
}
responseCallback(message.responseData);
delete responseCallbacks[message.responseId];
} else {
if (message.callbackId) {
var callbackResponseId = message.callbackId;
responseCallback = function(responseData) {
var message = { handlerName:message.handlerName, responseId:callbackResponseId, responseData:responseData };
sendMessageQueue.push(message);
messagingIframe.src = 'wvjbscheme://__WVJB_QUEUE_MESSAGE__';
};
}

// messageHandlers在这里
var handler = messageHandlers[message.handlerName];
if (!handler) {
console.log("WebViewJavascriptBridge: WARNING: no handler for message from ObjC:", message);
} else {
handler(message.data, responseCallback);
}
}
}

4.3 Native js bridge源码

4.3.1 send

参考Native到前端的消息流。Native的send是先拼接出js命令,再直接执行stringByEvaluatingJavaScriptFromString

1
2
3
4
5
6
7
8
9
10
11
12
13
14
15
16
17
18
- (void)sendData:(id)data responseCallback:(WVJBResponseCallback)responseCallback handlerName:(NSString*)handlerName {
NSMutableDictionary* message = [NSMutableDictionary dictionary];

if (data) {
message[@"data"] = data;
}

if (responseCallback) {
NSString* callbackId = [NSString stringWithFormat:@"objc_cb_%ld", ++_uniqueId];
self.responseCallbacks[callbackId] = [responseCallback copy];
message[@"callbackId"] = callbackId;
}

if (handlerName) {
message[@"handlerName"] = handlerName;
}
[self _queueMessage:message];
}
1
2
3
4
5
6
7
8
9
10
11
12
13
14
15
16
17
18
19
20
21
22
23
//命令拼接
- (void)_dispatchMessage:(WVJBMessage*)message {
NSString *messageJSON = [self _serializeMessage:message pretty:NO];
[self _log:@"SEND" json:messageJSON];
messageJSON = [messageJSON stringByReplacingOccurrencesOfString:@"\\" withString:@"\\\\"];
messageJSON = [messageJSON stringByReplacingOccurrencesOfString:@"\"" withString:@"\\\""];
messageJSON = [messageJSON stringByReplacingOccurrencesOfString:@"\'" withString:@"\\\'"];
messageJSON = [messageJSON stringByReplacingOccurrencesOfString:@"\n" withString:@"\\n"];
messageJSON = [messageJSON stringByReplacingOccurrencesOfString:@"\r" withString:@"\\r"];
messageJSON = [messageJSON stringByReplacingOccurrencesOfString:@"\f" withString:@"\\f"];
messageJSON = [messageJSON stringByReplacingOccurrencesOfString:@"\u2028" withString:@"\\u2028"];
messageJSON = [messageJSON stringByReplacingOccurrencesOfString:@"\u2029" withString:@"\\u2029"];

NSString* javascriptCommand = [NSString stringWithFormat:@"WebViewJavascriptBridge._handleMessageFromObjC('%@');", messageJSON];
if ([[NSThread currentThread] isMainThread]) {
[self _evaluateJavascript:javascriptCommand];

} else {
dispatch_sync(dispatch_get_main_queue(), ^{
[self _evaluateJavascript:javascriptCommand];
});
}
}
1
2
3
4
5
//命令执行
- (NSString*) _evaluateJavascript:(NSString*)javascriptCommand
{
return [_webView stringByEvaluatingJavaScriptFromString:javascriptCommand];
}

4.3.2 receive

参考FE到Native消息流。

1
2
3
4
//Native js bridge方法管理(给js用的)
- (void)registerHandler:(NSString *)handlerName handler:(WVJBHandler)handler {
_base.messageHandlers[handlerName] = [handler copy];
}
1
2
3
4
5
6
7
8
9
10
11
12
13
14
15
16
- (BOOL)webView:(UIWebView *)webView shouldStartLoadWithRequest:(NSURLRequest *)request navigationType:(UIWebViewNavigationType)navigationType {

// core code {
NSURL *url = [request URL];
__strong WVJB_WEBVIEW_DELEGATE_TYPE* strongDelegate = _webViewDelegate;
if ([_base isCorrectProcotocolScheme:url]) {
if ([_base isQueueMessageURL:url]) {
// 获取JS的messageQueue
NSString *messageQueueString = [self _evaluateJavascript:[_base webViewJavascriptFetchQueyCommand]];
[_base flushMessageQueue:messageQueueString];
}
return NO;
}
// core code }

}
1
2
3
-(NSString *)webViewJavascriptFetchQueyCommand {
return @"WebViewJavascriptBridge._fetchQueue();";
}
1
2
3
4
5
6
7
8
9
10
11
12
13
14
15
16
17
18
19
20
21
22
23
24
25
26
27
28
29
30
31
32
33
34
35
36
37
38
39
40
41
42
43
44
45
46
47
48
49
50
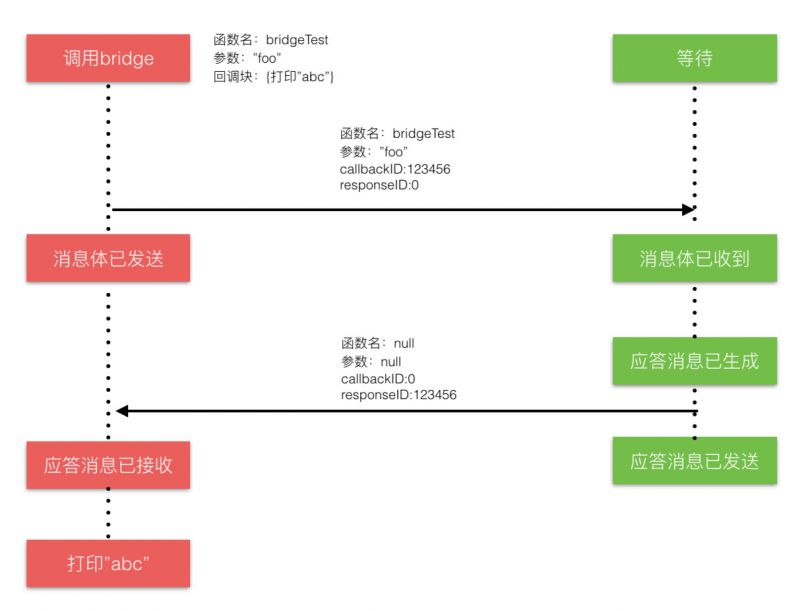
- (void)flushMessageQueue:(NSString *)messageQueueString{
if (messageQueueString == nil || messageQueueString.length == 0) {
NSLog(@"WebViewJavascriptBridge: WARNING: ObjC got nil while fetching the message queue JSON from webview. This can happen if the WebViewJavascriptBridge JS is not currently present in the webview, e.g if the webview just loaded a new page.");
return;
}

// 拿到消息,按照消息handler
id messages = [self _deserializeMessageJSON:messageQueueString];
for (WVJBMessage* message in messages) {
if (![message isKindOfClass:[WVJBMessage class]]) {
NSLog(@"WebViewJavascriptBridge: WARNING: Invalid %@ received: %@", [message class], message);
continue;
}
[self _log:@"RCVD" json:message];

NSString* responseId = message[@"responseId"];
if (responseId) { // 如果是应答消息则执行并结束
WVJBResponseCallback responseCallback = _responseCallbacks[responseId];
responseCallback(message[@"responseData"]);
[self.responseCallbacks removeObjectForKey:responseId];
} else { // 如果是普通调用消息,则根据是否需要对其应答做相应处理
WVJBResponseCallback responseCallback = NULL;
NSString* callbackId = message[@"callbackId"];
if (callbackId) {
responseCallback = ^(id responseData) {
if (responseData == nil) {
responseData = [NSNull null];
}

WVJBMessage* msg = @{ @"responseId":callbackId, @"responseData":responseData };
[self _queueMessage:msg];
};
} else {
responseCallback = ^(id ignoreResponseData) {
// Do nothing
};
}

// 在messageHandlers里面查找handler
WVJBHandler handler = self.messageHandlers[message[@"handlerName"]];

if (!handler) {
NSLog(@"WVJBNoHandlerException, No handler for message from JS: %@", message);
continue;
}
// 执行handler
handler(message[@"data"], responseCallback);
}
}
}

5总结

本文从JS bridge的基础知识讲到WebViewJavascriptBridge的源码实现。涉及的点有消息流,消息体,消息队列等。其中比较有意思的是回调实现原理。算是对自己阅读代码的一个记录。

1 理解自身内容尺寸约束与抗压抗拉

自身内容尺寸约束:一般来说,要确定一个视图的精确位置,至少需要4个布局约束(以确定水平位置x、垂直位置y、宽度w和高度h)。但是,某些用来展现内容的用户控件,例如文本控件UILabel、按钮UIButton、图片视图UIImageView等,它们具有自身内容尺寸(Intrinsic Content Size),此类用户控件会根据自身内容尺寸添加布局约束。也就是说,如果开发者没有显式给出其宽度或者高度约束,则其自动添加的自身内容约束将会起作用。因此看似“缺失”约束,实际上并非如此。

关于自身内容尺寸约束,简单来说就是某些用来展现内容的用户控件,它们会根据自身内容尺寸添加布局约束。

自身内容尺寸约束的抗挤压与抗拉抻效果。弹簧会有自身固有长度,当有外力作用时,弹簧会抵抗外力作用,尽量接近固有长度。
抗拉抻:当外力拉长弹簧时,弹簧长度大于固有长度,且产生向内收的力阻止外力拉抻,且尽量维持长度接近自身固有长度。 
抗挤压:当外力挤压弹簧时,弹簧长度小于固有长度,且产生向外顶的力阻止外力挤压,且尽量维持长度接近自身固有长度。

关于抗压抗拉,就是布局冲突需要牺牲某些控件的某些宽度或者高度约束时,抗压高的控件越不容易被压缩,抗拉高的控件越不容易被拉升。即自身布局对抗外界布局的能力。

样例:

一种常见的业务场景是用户修改地址,在输入新地址之前先读取用户之前的地址作为填充。UI实现是水平平行的UILabel和UITextField。
代码实现如下:

1
2
3
4
5
6
7
8
9
10
11
12
13
14
15
16
17
18
19
20
21
22
23
24
25
26
27
28
29
30
31
32
33
34
35
36
37
38
39
40
41
42
- (NSString *)aLongAddress
{
return @"A long long long long long long long long long address";
}

- (NSString *)aShortAddress
{
return @"A short address";
}

- (void)sampleCode
{
UIView *layoutView = [UIView new];
layoutView.frame = CGRectMake(0, 200, [UIScreen mainScreen].bounds.size.width, 100);
layoutView.backgroundColor = [[UIColor alloc] initWithRed:0.5 green:0.5 blue:0.5 alpha:0.5];
[self.view addSubview:layoutView];

UILabel *address = [[UILabel alloc] init];
[layoutView addSubview:address];
address.text = @"地址:";
address.backgroundColor = [UIColor blueColor];
[address mas_makeConstraints:^(MASConstraintMaker *make) {
make.centerY.equalTo(layoutView);
make.left.equalTo(layoutView).offset(10);
}];

UITextField *addressTextField = [[UITextField alloc] init];
[layoutView addSubview:addressTextField];
addressTextField.returnKeyType = UIReturnKeyDone;
addressTextField.font = [UIFont systemFontOfSize:15];
addressTextField.clearButtonMode = UITextFieldViewModeWhileEditing;
addressTextField.layer.borderWidth = 1 / [UIScreen mainScreen].scale;
addressTextField.layer.borderColor = [[[UIColor alloc] initWithRed:1 green:1 blue:0 alpha:1] CGColor];
addressTextField.layer.cornerRadius = 3;
addressTextField.text = [self aLongAddress];
[addressTextField mas_makeConstraints:^(MASConstraintMaker *make) {
make.height.equalTo(address);
make.centerY.equalTo(address);
make.right.equalTo(layoutView.mas_right).offset(-10);
make.left.equalTo(address.mas_right).offset(10);
}];
}

此处使用了UILabel的自身内容尺寸约束,当houseNumberTextField.text = [self aShortAddress]UI表现正常。

但,当houseNumberTextField.text = [self aLongAddress]时会出现address UILabel被挤压掉的情况,如下图所示:

1

原因是address Label的水平抗压缩没有设置。

在address Label创建的时候添加如下代码[address setContentCompressionResistancePriority:UILayoutPriorityRequired forAxis:UILayoutConstraintAxisHorizontal]则显示正常。

另,在某些情况下存在view被拉升,极有可能是没有设置抗拉升,此处不一一列举。

附,抗压抗拉相关API如下:

1
2
3
4
5
6
7

- (UILayoutPriority)contentHuggingPriorityForAxis:(UILayoutConstraintAxis)axis NS_AVAILABLE_IOS(6_0);
- (void)setContentHuggingPriority:(UILayoutPriority)priority forAxis:(UILayoutConstraintAxis)axis NS_AVAILABLE_IOS(6_0);

- (UILayoutPriority)contentCompressionResistancePriorityForAxis:(UILayoutConstraintAxis)axis NS_AVAILABLE_IOS(6_0);
- (void)setContentCompressionResistancePriority:(UILayoutPriority)priority forAxis:(UILayoutConstraintAxis)axis NS_AVAILABLE_IOS(6_0);

2 NSLayoutConstraint只能修改constant

NSLayoutConstraint即自动布局的约束类,它是自动布局的关键之一。该类有如下属性我们需要重点关注。

1
2
3
4
5
6
7
8
9
10
11
12
13
14
15
16
17
18
19
20
21
22
23
24
25
26
27
28
29
NS_CLASS_AVAILABLE_IOS(6_0)
@interface NSLayoutConstraint : NSObject

// other code

@property UILayoutPriority priority;
@property BOOL shouldBeArchived;

/* accessors
firstItem.firstAttribute {==,<=,>=} secondItem.secondAttribute * multiplier + constant
*/
@property (readonly, assign) id firstItem;
@property (readonly) NSLayoutAttribute firstAttribute;
@property (readonly) NSLayoutRelation relation;
@property (nullable, readonly, assign) id secondItem;
@property (readonly) NSLayoutAttribute secondAttribute;
@property (readonly) CGFloat multiplier;

/* Unlike the other properties, the constant may be modified after constraint creation. Setting the constant on an existing constraint performs much better than removing the constraint and adding a new one that's just like the old but for having a new constant.
*/
@property CGFloat constant;

/* The receiver may be activated or deactivated by manipulating this property.  Only active constraints affect the calculated layout.  Attempting to activate a constraint whose items have no common ancestor will cause an exception to be thrown. Defaults to NO for newly created constraints. */
@property (getter=isActive) BOOL active NS_AVAILABLE(10_10, 8_0);

// other code

@end

布局公式:firstItem.firstAttribute {==,<=,>=} secondItem.secondAttribute * multiplier + constant

解释:firstItem与secondItem分别是界面中受约束的视图与被参照的视图。

注意:当使用代码来修改约束时,只能修改约束的常量值constant。一旦创建了约束,其他只读属性都是无法修改的,特别要注意的是比例系数multiplier也是只读的。

Masonry是基于NSLayoutConstraint等类的封装,也正是如此,我们在调用- (NSArray *)mas_updateConstraints:(void(^)(MASConstraintMaker *))block的时候也只能更新NSLayoutConstraint中的@property CGFloat constant

MASViewConstraint找到如下代码可以佐证:

1
2
3
4
5
6
7
8
9
10
11
12
13
14
15
16
17
18
19
20
21
22
23
24
25
26
27
28
29
30
31
32
33
34
35
36
37
38
39
- (void)install {

// other code

MASLayoutConstraint *existingConstraint = nil;
if (self.updateExisting) { //如果是update,则去匹配对应的existingConstraint
existingConstraint = [self layoutConstraintSimilarTo:layoutConstraint];
}
if (existingConstraint) { //找到了existingConstraint,最终也只更新了existingConstraint.constant
// just update the constant
existingConstraint.constant = layoutConstraint.constant;
self.layoutConstraint = existingConstraint;
} else { //没有找到existingConstraint,添加一个新的约束
[self.installedView addConstraint:layoutConstraint];
self.layoutConstraint = layoutConstraint;
[firstLayoutItem.mas_installedConstraints addObject:self];
}
}

// 除了constant,其它都一样的约束是Similar约束
- (MASLayoutConstraint *)layoutConstraintSimilarTo:(MASLayoutConstraint *)layoutConstraint {
// check if any constraints are the same apart from the only mutable property constant

// go through constraints in reverse as we do not want to match auto-resizing or interface builder constraints
// and they are likely to be added first.
for (NSLayoutConstraint *existingConstraint in self.installedView.constraints.reverseObjectEnumerator) {
if (![existingConstraint isKindOfClass:MASLayoutConstraint.class]) continue;
if (existingConstraint.firstItem != layoutConstraint.firstItem) continue;
if (existingConstraint.secondItem != layoutConstraint.secondItem) continue;
if (existingConstraint.firstAttribute != layoutConstraint.firstAttribute) continue;
if (existingConstraint.secondAttribute != layoutConstraint.secondAttribute) continue;
if (existingConstraint.relation != layoutConstraint.relation) continue;
if (existingConstraint.multiplier != layoutConstraint.multiplier) continue;
if (existingConstraint.priority != layoutConstraint.priority) continue;

return (id)existingConstraint;
}
return nil;
}

样例:

1
2
3
4
5
6
7
8
9
10
11
12
13
14
15
16
17
18
19
20
21
22
23
24
25
26
27
28
29
30
31
32
33
34
35
36
37
38
39
40
41
42
43
44
@interface ViewController ()

@property (nonatomic, strong) UILabel *lbl;
@property (nonatomic, strong) UIButton *btn;

@end

@implementation ViewController

- (void)viewDidLoad {
[super viewDidLoad];
// Do any additional setup after loading the view, typically from a nib.

self.btn = [UIButton buttonWithType:UIButtonTypeCustom];
self.btn.backgroundColor = [UIColor blueColor];
[self.btn setTitle:@"按钮" forState:UIControlStateNormal];
[self.btn addTarget:self action:@selector(onTest:) forControlEvents:UIControlEventTouchDown];
[self.view addSubview:self.btn];
[self.btn mas_updateConstraints:^(MASConstraintMaker *make) {
make.top.equalTo(self.view).offset(200);
make.centerX.equalTo(self.view);
make.size.mas_equalTo(CGSizeMake(100, 33));
}];

self.lbl = [[UILabel alloc] init];
self.lbl.text = @"一个label";
self.lbl.backgroundColor = [UIColor redColor];
self.lbl.textAlignment = NSTextAlignmentCenter;
[self.view addSubview:self.lbl];
[self.lbl mas_updateConstraints:^(MASConstraintMaker *make) {
make.top.equalTo(self.view).offset(300);
make.centerX.equalTo(self.view);
make.size.equalTo(self.btn);
}];
}

- (void)onTest:(id)sender
{
[self.lbl mas_updateConstraints:^(MASConstraintMaker *make) {
make.size.mas_equalTo(CGSizeMake(200, 100));
}];
}

@end

当按钮被按下时,控制台出现如下警告

1
2
3
4
5
6
7
8
9
10
11
12
13
14
15
16
17
18
19
20
21
22
23
24
25
26
27
28
29
30
31
32
2016-08-03 18:49:13.110 layout[47924:2886276] Unable to simultaneously satisfy constraints.
Probably at least one of the constraints in the following list is one you don't want.
Try this:
(1) look at each constraint and try to figure out which you don't expect;
(2) find the code that added the unwanted constraint or constraints and fix it.
(
"<MASLayoutConstraint:0x7ffecb632470 UIButton:0x7ffecb4f28e0.width == 100>",
"<MASLayoutConstraint:0x7ffecb637550 UILabel:0x7ffecb637030.width == UIButton:0x7ffecb4f28e0.width>",
"<MASLayoutConstraint:0x7ffecb71fc10 UILabel:0x7ffecb637030.width == 200>"
)

Will attempt to recover by breaking constraint
<MASLayoutConstraint:0x7ffecb71fc10 UILabel:0x7ffecb637030.width == 200>

Make a symbolic breakpoint at UIViewAlertForUnsatisfiableConstraints to catch this in the debugger.
The methods in the UIConstraintBasedLayoutDebugging category on UIView listed in <UIKit/UIView.h> may also be helpful.
2016-08-03 18:49:13.111 layout[47924:2886276] Unable to simultaneously satisfy constraints.
Probably at least one of the constraints in the following list is one you don't want.
Try this:
(1) look at each constraint and try to figure out which you don't expect;
(2) find the code that added the unwanted constraint or constraints and fix it.
(
"<MASLayoutConstraint:0x7ffecb612bc0 UIButton:0x7ffecb4f28e0.height == 33>",
"<MASLayoutConstraint:0x7ffecb625300 UILabel:0x7ffecb637030.height == UIButton:0x7ffecb4f28e0.height>",
"<MASLayoutConstraint:0x7ffecb486f10 UILabel:0x7ffecb637030.height == 100>"
)

Will attempt to recover by breaking constraint
<MASLayoutConstraint:0x7ffecb486f10 UILabel:0x7ffecb637030.height == 100>

Make a symbolic breakpoint at UIViewAlertForUnsatisfiableConstraints to catch this in the debugger.
The methods in the UIConstraintBasedLayoutDebugging category on UIView listed in <UIKit/UIView.h> may also be helpful.

原因是,lbl创建时其size约束是make.size.equalTo(self.btn),但btn被点击时,企图去update size约束为make.size.mas_equalTo(CGSizeMake(200, 100)),然而无法找到existingConstraint,因此实际上是额外添加了一个约束make.size.mas_equalTo(CGSizeMake(200, 100))出现了布局冲突。

这件事可以这么看,NSLayoutConstraint只能修改constant决定了mas_updateConstraints的实现方式为:找到既有约束就去改变constant找不到既有约束就添加新约束。

3 被Masonry布局的view一定要与比较view有共同的祖先view

这句话比较拗口,其中涉及三类view,解释如下。

  1. 被Masonry布局的view:执行了- (NSArray *)mas_makeConstraints:(void(^)(MASConstraintMaker *make))block- (NSArray *)mas_updateConstraints:(void(^)(MASConstraintMaker *make))block - (NSArray *)mas_remakeConstraints:(void(^)(MASConstraintMaker *make))block等函数的view。
  2. 比较view:以上3函数block块里面出现的view。
  3. 共同的祖先view:【1】和【2】的共同祖先view。

样例1:

1
2
3
4
5
6
7
8
9
10
11
12
13
14
15
16
17
- (void)sampleCode
{
UIView *v0 = [UIView new];
[self.view addSubview:v0];

UIView *v1 = [UIView new];
[v0 addSubview:v1];
[v1 mas_makeConstraints:^(MASConstraintMaker *make) {
make.size.mas_equalTo(CGSizeMake(10, 10));
}];

UIView *v2 = [UIView new];
[v0 addSubview:v2];
[v2 mas_makeConstraints:^(MASConstraintMaker *make) {
make.size.equalTo(v1);
}];
}

针对如下代码块来说

1
2
3
4
5
UIView *v2 = [UIView new];
[v0 addSubview:v2];
[v2 mas_makeConstraints:^(MASConstraintMaker *make) {
make.size.equalTo(v1);
}];

v2是被Masonry布局的view,v1是比较view,v0是共同的祖先view。

样例2:

1
2
3
4
5
6
7
8
9
10
11
12
13
14
15
16
17
18
@implementation AutoLayoutViewController

- (void)viewDidLoad
{
[super viewDidLoad];

[self useMasonryWithoutSuperView];
}

- (void)useMasonryWithoutSuperView
{
UIView *masView = [UIView new];
[masView mas_makeConstraints:^(MASConstraintMaker *make) {
make.center.equalTo(self.view);
}];
}

@end

以上代码执行时会crash,crash log如下:

1
2
2016-08-04 00:52:47.542 CommonTest[1731:22953] *** Assertion failure in -[MASViewConstraint install], /Users/shuncheng/SourceCode/SampleCode/AutoLayout/Pods/Masonry/Masonry/MASViewConstraint.m:338
2016-08-04 00:52:47.548 CommonTest[1731:22953] *** Terminating app due to uncaught exception 'NSInternalInconsistencyException', reason: 'couldn't find a common superview for <UIView: 0x7fa59bd30dd0; frame = (0 0; 0 0); layer = <CALayer: 0x7fa59bd2f3c0>> and <UIView: 0x7fa59bd30c60; frame = (0 0; 414 736); autoresize = W+H; layer = <CALayer: 0x7fa59bd24780>>'

crash的原因显而易见,即,masView(被Masonry布局的view)与self.view(比较view)没有共同祖先view,因为masView没有父view,所以它和self.view必然没有共同祖先view。

被Masonry布局的view没有添加到superview上其实比较容易被发现,最怕的是出现如样例3一样的鬼畜情况。

样例3:

1
2
3
4
5
6
7
8
9
10
11
12
13
14
15
16
17
18
19
20
21
22
23
24
25
26
27
28
29
30
31
32
33
34
@implementation AutoLayoutViewController

- (void)viewDidLoad
{
[super viewDidLoad];

[self sampleCode];
}

- (void)sampleCode
{
AutoLayoutViewController * __weak weakSelf = self;
[fooNetworkModel fetchData:^{
AutoLayoutViewController * self = weakSelf;
[AutoLayoutViewController showSampleViewAtView:self.view];
}];
}

+ (void)showSampleViewAtView:(UIView *)view
{
UIView *v1 = [UIView new];
[view addSubview:v1];
[v1 mas_makeConstraints:^(MASConstraintMaker *make) {
make.size.mas_equalTo(CGSizeMake(10, 10));
}];

UIView *v2 = [UIView new];
[view addSubview:v2];
[v2 mas_makeConstraints:^(MASConstraintMaker *make) {
make.size.equalTo(v1);
}];
}

@end

以上代码通常不会出错,但是一种异常情况是:在AutoLayoutViewController析构后,网络数据返回,此时AutoLayoutViewController * self = weakSelfself == nil。执行[AutoLayoutViewController showSampleViewAtView:nil],则会出现【样例2】一样的crash。

原因是:v1和v2都没有添加到view上去(因为view为空)所以make.size.equalTo(v1)会出错(v1和v2没有共同的父view)。由此也引申到weakSelf的副作用,即必须要确保weakSelf是nil时,执行逻辑完全没有问题(目前已经两次被坑)。

4 不要被update迷惑

这里说的update有两层含义:

  1. UIView的方法- (void)updateConstraints NS_AVAILABLE_IOS(6_0)
  2. Masonry的方法- (NSArray *)mas_updateConstraints:(void(^)(MASConstraintMaker *make))block

这里先来讨论一下UIView的- (void)updateConstraints方法。

- (void)updateConstraints方法是用来更新view约束的,它有一个常见的使用场景——批量更新约束。比如你的多个约束是由多个不同的property决定,每次设置property都会直接更新局部约束。这样效率不高。不如直接override- (void)updateConstraints方法,在方面里面对property进行判断,每次设置property的时候调用一下- (void)setNeedsUpdateConstraints。伪代码如下:

优化前:

1
2
3
4
5
6
7
8
9
10
11
12
13
14
15
16
17
18
19
20
21
22
23
24
25
26
27
28
29
30
@implementation AutoLayoutView

- (void)setFactor1:(NSInteger)factor1
{
_factor1 = factor1;

if (_factor1满足条件) {
更新约束1
}
}

- (void)setFactor2:(NSInteger)factor2
{
_factor2 = factor2;

if (_factor2满足条件) {
更新约束2
}
}

- (void)setFactor3:(NSInteger)factor3
{
_factor3 = factor3;

if (_factor3满足条件) {
更新约束3
}
}

@end

优化后:

1
2
3
4
5
6
7
8
9
10
11
12
13
14
15
16
17
18
19
20
21
22
23
24
25
26
27
28
29
30
31
32
33
34
35
36
37
38
39
40
41
@implementation AutoLayoutView

- (void)setFactor1:(NSInteger)factor1
{
_factor1 = factor1;

[self setNeedsUpdateConstraints];
}

- (void)setFactor2:(NSInteger)factor2
{
_factor2 = factor2;

[self setNeedsUpdateConstraints];
}

- (void)setFactor3:(NSInteger)factor3
{
_factor3 = factor3;

[self setNeedsUpdateConstraints];
}

- (void)updateConstraints
{
if (self.factor1满足) {
更新约束1
}

if (self.factor2满足) {
更新约束2
}

if (self.factor3满足) {
更新约束3
}

[super updateConstraints];
}

@end

注意:一种有误区的写法是在- (void)updateConstraints方法中进行初次constraint设置,这是不被推荐的。推荐的写法是在init或者viewDidLoad中进行view的初次constraint设置。

Masonry的方法- (NSArray *)mas_updateConstraints:(void(^)(MASConstraintMaker *make))block我们在第二节已经讨论过了。刚接触自动布局和Masonry的同学很容易跟着感觉在- (void)updateConstraints函数里面调用Masonry的- (NSArray *)mas_updateConstraints:(void(^)(MASConstraintMaker *make))block。实际上两者并没有必然联系。大多数情况在- (void)updateConstraints里面调用- (NSArray *)mas_updateConstraints:(void(^)(MASConstraintMaker *make))block很有可能产生布局冲突。

样例

1
2
3
4
5
6
7
8
9
10
11
12
13
14
15
16
17
18
19
20
21
22
23
24
25
26
27
28
29
30
31
32
33
34
35
36
37
38
39
40
41
42
43
44
45
46
47
48
49
50
51
52
53
54
55
56
57
58
59
60
61
62
63
64
65
66
67
68
69
70
71
72
73
74
75
76
77
78
79
// 头文件
typedef NS_ENUM(NSUInteger, AutoLayoutType) {
HorizontalLayout,
VerticalLayout,
};

@interface AutoLayoutView : UIView

@property (nonatomic, strong) UILabel *name;
@property (nonatomic, strong) UILabel *address;

@property (nonatomic, assign) AutoLayoutType layoutType;

@end

// 实现文件
@implementation AutoLayoutView

- (instancetype)initWithFrame:(CGRect)frame
{
if (self = [super initWithFrame:frame]) {
_name = [[UILabel alloc] init];
[self addSubview:_name];

_address = [[UILabel alloc] init];
[self addSubview:_address];

[_name mas_updateConstraints:^(MASConstraintMaker *make) {
make.left.top.equalTo(self);
}];
}
return self;
}

- (void)updateConstraints
{
if (self.layoutType == HorizontalLayout) {
// // 此处误用mas_updateConstraints
[self.address mas_updateConstraints:^(MASConstraintMaker *make) {
make.top.equalTo(self.name);
make.left.equalTo(self.name.mas_right).offset(10);
}];
} else {
// 此处误用mas_updateConstraints
[self.address mas_updateConstraints:^(MASConstraintMaker *make) {
make.left.equalTo(self.name);
make.top.equalTo(self.name.mas_bottom).offset(10);
}];
}

[super updateConstraints];
}

- (void)setLayoutType:(AutoLayoutType)layoutType
{
_layoutType = layoutType;

[self setNeedsUpdateConstraints];
}

@end

// 外部调用代码
- (void)sampleCode
{
AutoLayoutView *view = [[AutoLayoutView alloc] init];
view.name.text = @"name";
view.address.text = @"address";
[self.view addSubview:view];
[view mas_makeConstraints:^(MASConstraintMaker *make) {
make.center.equalTo(self.view);
make.size.mas_equalTo(CGSizeMake(200, 300));
}];

dispatch_after(dispatch_time(DISPATCH_TIME_NOW, (int64_t)(2 * NSEC_PER_SEC)), dispatch_get_main_queue(), ^{
view.layoutType = VerticalLayout; //修改布局方式后,出现布局冲突
});
}

5 总结

本文梳理了一下自动布局和Masonry使用的误区。在基本概念没搞清的情况下,很容易犯错。总结起来就如下4点:

  1. 理解自身内容尺寸约束与抗压抗拉
  2. NSLayoutConstraint只能修改constant和- (NSArray *)mas_updateConstraints:(void(^)(MASConstraintMaker *make))block实现细节之间的关系
  3. 被Masonry布局的view一定要与比较view有共同的祖先view
  4. 区分UIView的- (void)updateConstraints方法和- (NSArray *)mas_updateConstraints:(void(^)(MASConstraintMaker *make))block

6 参考资料

WWDC-Mysteries of Auto Layout, Part 2

1 removeObjectAtIndex和removeObject的不同之处

removeObjectAtIndex:

Removes the object at index .
To fill the gap, all elements beyond index are moved by subtracting 1 from their index.

Important:Important
Raises an exception NSRangeException if index is beyond the end of the array.

删除指定NSMutableArray中指定index的对象,注意index不能越界。

removeObject:

Removes all occurrences in the array of a given object.
This method uses indexOfObject: to locate matches and then removes them by using removeObjectAtIndex:. Thus, matches are determined on the basis of an object’s response to the isEqual: message. If the array does not contain anObject, the method has no effect (although it does incur the overhead of searching the contents).

删除NSMutableArray中所有isEqual:待删对象的对象

从API文档可以看出,两者之间的主要区别是removeObjectAtIndex:最多只能删除一个对象,而removeObject:可以删除多个对象(只要符合isEqual:的都删除掉)。

2 在NSMutableArray循环中删除对象

2.1 可能多删的做法

删除数组中的第一个@”remove”

1
2
3
4
5
6
7
8
9
10
11
12
13
- (void)removeObjectsUseFor
{
NSMutableArray *contents = [@[@"how", @"to", @"remove", @"remove", @"object"] mutableCopy];
for (NSInteger i = 0; i != contents.count; ++i) {
NSString *var = contents[i];
if ([var isEqualToString:@"remove"]) {
[contents removeObject:var];
break;
}
}

NSLog(@"%@", contents);
}

结果如下:

1
2
3
4
5
2016-07-31 21:14:13.541 RemoveObject[5862:310398] (
how,
to,
object
)

removeObject:的说明中可以看出,removeObject:不仅删除该对象本身,而且删除NSMutableArray中所有isEqual:待删对象的对象

2.2 可能漏删的做法

删除数组中所有的@”remove”

1
2
3
4
5
6
7
8
9
10
11
12
- (void)removeObjectsUseFor
{
NSMutableArray *contents = [@[@"how", @"to", @"remove", @"remove", @"object"] mutableCopy];
for (NSInteger i = 0; i != contents.count; ++i) {
NSString *var = contents[i];
if ([var isEqualToString:@"remove"]) {
[contents removeObjectAtIndex:i];
}
}

NSLog(@"%@", contents);
}

输出:

1
2
3
4
5
6
2016-07-31 21:19:59.615 RemoveObject[5886:315162] (
how,
to,
remove,
object
)

2.3 引发崩溃的做法

删除数组中所有的@”remove”

1
2
3
4
5
6
7
8
9
10
11
- (void)removeObjectsUseForIn
{
NSMutableArray *contents = [@[@"how", @"to", @"remove", @"object"] mutableCopy];
for (NSString *var in contents) {
if ([var isEqualToString:@"remove"]) {
[contents removeObject:var];
}
}

NSLog(@"%@", contents);
}

输出:崩溃

1
2016-07-31 21:27:40.337 RemoveObject[5915:321407] *** Terminating app due to uncaught exception 'NSGenericException', reason: '*** Collection <__NSArrayM: 0x7f9388c95580> was mutated while being enumerated.'

不要在for in 循环中删除数组内部对象。

2.4 正确但别扭的做法

删除数组中所有的@”remove”

1
2
3
4
5
6
7
8
9
10
11
12
- (void)removeObjectsReversed
{
NSMutableArray *contents = [@[@"how", @"to", @"remove", @"remove", @"object"] mutableCopy];
for (NSInteger i = contents.count - 1; i >= 0; --i) {
NSString *var = contents[i];
if ([var isEqualToString:@"remove"]) {
[contents removeObjectAtIndex:i];
}
}

NSLog(@"%@", contents);
}

输出:

1
2
3
4
5
2016-07-31 21:31:37.655 RemoveObject[5934:325316] (
how,
to,
object
)

倒序删除,正确但有点别扭!

2.5 优雅的做法

1
2
3
4
5
6
7
8
9
10
11
12
- (void)removeObjectsUseEnumration
{
NSMutableArray *contents = [@[@"how", @"remove", @"to", @"remove", @"object"] mutableCopy];
NSIndexSet *indexSet =
[contents indexesOfObjectsPassingTest:^BOOL(NSString * _Nonnull var, NSUInteger idx, BOOL * _Nonnull stop) {
return [var isEqualToString:@"remove"];
}];
[contents removeObjectsAtIndexes:indexSet];

NSLog(@"%@", indexSet);
NSLog(@"%@", contents);
}

输出:

1
2
3
4
5
6
2016-07-31 22:10:42.404 RemoveObject[6014:338210] <NSIndexSet: 0x7fb73a516040>[number of indexes: 2 (in 2 ranges), indexes: (1 3)]
2016-07-31 22:10:42.404 RemoveObject[6014:338210] (
how,
to,
object
)

先通过indexesOfObjectsPassingTest:把待删除对象的index找出来,再调用removeObjectsAtIndexes:进行一次性删除。

3 总结

  1. 不建议在NSMutableArray循环中使用removeObject:删除该NSMutableArray内部对象,此举可能引发误删,如2.1所示;
  2. 不建议在NSMutableArray的for in 循环中删除对象,此举可能引发崩溃,如2.3所示;
  3. 建议删除NSMutableArray内部对象时,先拿到待删对象的index,再进行一次性删除,如2.5所示。

1 frame

layer相对其父坐标系的位置。包括矩形左上角点,矩形宽高。值得注意的是layer被旋转后的宽高。如下图所示,bounds是40*50,frame是62*64。

![CALayer-frame](/assets/img/postImage/iOS frame、bounds、anchorPoint、position以及transform/CALayer-frame.jpg)

2 bounds

layer相对其内部坐标系的位置。

3 anchorPoint

layer的锚点(默认是{0.5, 0.5},即在layer的中部)相对其内部单位坐标系的位置。锚点就是layer旋转的中点。左上角是{0, 0},右下角是{1,1}。值得注意的是锚点的值可以比0小,比1大,例如{-0.5, 1.5},如此layer旋转可以围绕外部某个点

![CALayer-anchorPoint](/assets/img/postImage/iOS frame、bounds、anchorPoint、position以及transform/CALayer-anchorPoint.png)

4 position

layer的锚点相对其外部坐标系的位置。

1
2
3
4
5
6
7
CALayer *layer = [[CALayer alloc] init];
[self.view.layer addSublayer:layer];
layer.backgroundColor = [[UIColor redColor] CGColor];
layer.bounds = CGRectMake(0, 0, 200, 60);
// 在不改变锚点的情况下设置layer居中
layer.position = CGPointMake(layer.superlayer.frame.size.width / 2, layer.position.y); // 水平居中
layer.position = CGPointMake(layer.position.x, layer.superlayer.frame.size.height / 2); // 垂直居中

5 transform (3D变换)

坐标变换,变换公式如下:

![CALayer-transform](/assets/img/postImage/iOS frame、bounds、anchorPoint、position以及transform/CALayer-transform.jpg)

样例:

scale变换

1
2
3
4
5
6
7
8
9
10
11
12
13
14
15
16
CALayer *layer = [[CALayer alloc] init];
[self.view.layer addSublayer:layer];
layer.backgroundColor = [[UIColor redColor] CGColor];
layer.bounds = CGRectMake(0, 0, 200, 60);
layer.position = CGPointMake(200, 200);
layer.transform = CATransform3DMakeScale(2, 0.5, 1); // x拉升为之前的2倍,y压缩为之前的1 / 2, z不变

NSLog(@"CALayer frame : %@", NSStringFromCGRect(layer.frame));
NSLog(@"CALayer bounds : %@", NSStringFromCGRect(layer.bounds));
NSLog(@"CALayer position : %@", NSStringFromCGPoint(layer.position));
NSLog(@"CALayer anchorPoint : %@", NSStringFromCGPoint(layer.anchorPoint));

//2016-07-27 21:10:38.034 CommonTest[47569:5204919] CALayer frame : { {0, 185}, {400, 30} }
//2016-07-27 21:10:38.034 CommonTest[47569:5204919] CALayer bounds : { {0, 0}, {200, 60} }
//2016-07-27 21:10:38.035 CommonTest[47569:5204919] CALayer position : {200, 200}
//2016-07-27 21:10:38.035 CommonTest[47569:5204919] CALayer anchorPoint : {0.5, 0.5}

旋转变换

1
2
3
4
5
6
7
8
9
10
11
12
13
14
15
16
17
18
19
20
21
22
23
24
25
26
27
28
29
CGFloat Radian(CGFloat angle)
{
return angle * M_PI / 180.f;
}

CALayer *layer = [[CALayer alloc] init];
[self.view.layer addSublayer:layer];
layer.backgroundColor = [[UIColor redColor] CGColor];
layer.bounds = CGRectMake(0, 0, 200, 60);
layer.position = CGPointMake(200, 200);
layer.transform = CATransform3DMakeRotation(Radian(30), 0, 0, 1); //绕着Z轴顺时针旋转30°

NSLog(@"%@ %@ %@ %@", @(layer.transform.m11), @(layer.transform.m12), @(layer.transform.m13), @(layer.transform.m14));
NSLog(@"%@ %@ %@ %@", @(layer.transform.m21), @(layer.transform.m22), @(layer.transform.m23), @(layer.transform.m24));
NSLog(@"%@ %@ %@ %@", @(layer.transform.m31), @(layer.transform.m32), @(layer.transform.m33), @(layer.transform.m34));
NSLog(@"%@ %@ %@ %@", @(layer.transform.m41), @(layer.transform.m42), @(layer.transform.m43), @(layer.transform.m44));
NSLog(@"CALayer frame : %@", NSStringFromCGRect(layer.frame));
NSLog(@"CALayer bounds : %@", NSStringFromCGRect(layer.bounds));
NSLog(@"CALayer position : %@", NSStringFromCGPoint(layer.position));
NSLog(@"CALayer anchorPoint : %@", NSStringFromCGPoint(layer.anchorPoint));

//2016-07-27 21:24:13.989 CommonTest[48025:5281194] 0.8660254037844387 0.4999999999999999 0 0
//2016-07-27 21:24:13.990 CommonTest[48025:5281194] -0.4999999999999999 0.8660254037844387 0 0
//2016-07-27 21:24:13.990 CommonTest[48025:5281194] 0 0 1 0
//2016-07-27 21:24:13.990 CommonTest[48025:5281194] 0 0 0 1
//2016-07-27 21:24:13.990 CommonTest[48025:5281194] CALayer frame : { {98.397459621556123, 124.01923788646684}, {203.20508075688778, 151.96152422706632} }
//2016-07-27 21:24:13.990 CommonTest[48025:5281194] CALayer bounds : { {0, 0}, {200, 60} }
//2016-07-27 21:24:13.991 CommonTest[48025:5281194] CALayer position : {200, 200}
//2016-07-27 21:24:13.991 CommonTest[48025:5281194] CALayer anchorPoint : {0.5, 0.5}

6 CALayer的frame决定因素

view或者layer的frame其实不是一个独立的属性,它是由bounds、position和transform决定的虚拟属性。因此,一旦以上3个属性发生变化frame就会变化。相反地,一旦改变frame,那么bounds、position和transform也可能变化。

The frame is not really a distinct property of the view or layer at all; it is a virtual property, computed from the bounds, position, and transform, and therefore changes when any of those properties are modified. Conversely, changing the frame may affect any or all of those values, as well.

7 参考文档

Core Animation Programming Guide

《iOS Core Animation Advanced Techniques》

1 说好的格式呢

1.1 static NSString *这种变量的命名尽量以k开头。

1
2
3
4
5
static NSString * const WMHomePageFlowPath = @"WMHomePageFlowPath";`

变为

static NSString * const kWMHomePageFlowPath = @"kWMHomePageFlowPath";

1.2 定义常量最好用static const

1
2
3
4
5
#define TOP_VIEW_FIX_HEIGHT 116.0

变为

static const CGFloat kTopViewFixHeight = 116.0f;

1.3 宏定义的名称全大写字母

1.4 使用现代OC语法

1
2
3
4
5
[eventDictionary setObject:code forKey:@"code"];

变为

eventDictionary[@"code"] = code;
1
2
3
4
5
[cellIndexs objectAtIndex:cellIndexs.count - 1];

变为

cellIndexs[cellIndexs.count - 1];

2 并没有什么卵用

2.1 函数传block参数,无意义的^{}不应该存在

1
[UIView animateWithDuration:0.1 animations:^{}];// 无意义

2.2 IDE自动生成的无用函数应该删除

1
2
3
- (void)didReceiveMemoryWarning {// IDE自动生成的函数,没用到就删了
[super didReceiveMemoryWarning];
}

2.3 无意义的判断

1
2
3
if (bottomImageView) {
bottomImageView.frame = imageViewRect;
}

3 良の实践

3.1 字面量字典或者字面量数组语法使用要注意nil变量

1
2
3
4
5
6
7
NSDictionary *URLParameters = @{@"address" : address,
@"keyword" : keyword,
@"poi_page_index" : poiPageIndex,
@"poi_page_size" : poiPageSize,
@"food_page_index" : foodPageIndex,
@"food_page_size" : foodPageSize};
// 以上代码在address、keyword、poiPageIndex、poiPageSize、foodPageIndex、foodPageSize任意一个变量为nil的时候会crash

一种经常出现的crash是使用字面量字典或者字面量数组的时候误添加值为nil的变量,从而直接崩溃。

3.2 各种type需要enum化

1
2
3
4
5
if (self.poi.deliveryType == 1) { //magic number,enum化
deliveryTimeView = [self viewForMTDelivery];
} else {
deliveryTimeView = [self viewForDeliveryTime];
}

3.3 恰当运用三目操作符

1
2
3
4
5
6
7
8
9
10
if (poi.picture.length > 0) {
[self.headImgView sd_setImageWithURL:[NSURL URLWithString:poi.picture]];
} else {
[self.headImgView sd_setImageWithURL:[NSURL URLWithString:defaultImage]];
}

变为

NSString *imgURLStr = poi.picture.length > 0 ? poi.picture : defaultImage;
[self.headImgView sd_setImageWithURL:[NSURL URLWithString:imgURLStr]];

3.4 同一个类的不同函数多次用到同一个常量,该常量应该升级为.m文件static const常量

1
titleLabel.centerY = 22.5;// 45 / 2.0 ? 建议45可以提出来,好多地方都用到了

3.5 一个函数内部有意义的量应该升级为const常量

1
2
3
4
5
6
7
8
9
10
11
12
1
if (distance > 500000) {
distance = 500000;
}
// 这些数字用 static const NSInteger命名一下?或者加个注释?

2
if (mutebelArray.count > 10) {//只保留10个搜索历史
NSRange removeRange = NSMakeRange(10, mutebelArray.count - 10);
[mutebelArray removeObjectsInRange:removeRange];
}
// 10提出来,kMaxRetainedSearchKeyCount = 10

3.6 protocol中申明为@optional的方法必须在调用处先用一下respondsToSelector判断

1
2
3
4
5
6
7
8
@protocol WMFoodListViewControllerDelegate <NSObject>

@optional
- (void)incFood:(WMOrderedSkuInfo *)orderedSku count:(NSInteger)count inBucket:(NSInteger)bucketNum animated:(BOOL)animated originalRect:(CGRect)originalRect;
- (void)decFood:(WMOrderedSkuInfo *)orderedSku count:(NSInteger)count;

@end
// 检查一下这些optional的代理方法。是否用respondsToSelector保护了

3.7 常用UI量应该变为宏定义

1
2
3
4
5
6
7
8
9
10
//ui
NaviBar高度
#ifndef WM_NAVIBAR_HEIGHT
#define WM_NAVIBAR_HEIGHT (WM_ABOVE_IOS(7) ? 64:44)
#endif

//1点的线宽
#ifndef WM_SINGLE_LINE_WEIGHT
#define WM_SINGLE_LINE_WEIGHT (1 / [UIScreen mainScreen].scale)
#endif

3.8 非必要不要在头文件里面直接#import其他头文件

1
2
3
4
5
6
7
8
9
10
11
12
13
14
15
16
17
18
19
20
21
22
23
24
某.h文件内容如下。。。

#import <Foundation/Foundation.h>
#import "WMOrder.h"
#import "WMDeliveryInfo.h"

@interface WMOrderPreviewInfo : NSObject

@property (nonatomic,strong) WMOrder *order;
@property (nonatomic, strong) WMDeliveryInfo *deliveryInfo;

@end

变为

@class WMOrder
@class WMDeliveryInfo

@interface WMOrderPreviewInfo : NSObject

@property (nonatomic,strong) WMOrder *order;
@property (nonatomic, strong) WMDeliveryInfo *deliveryInfo;

@end

尽量使用“向前声明”,减少类之间的编译耦合度。

3.9 非必要不使用下划线访问变量

除了初始化函数,其他各处非必要不使用下划线访问变量。不要直接访问property的内置的私有变量,不管读写,都用self.propertyName。否则在把代码重构为block的时候很容易忘记添加self,而引起循环引用。而通常使用self.propertyName访问变量的话,在代码进行block重构时,更容易发现错误。

1
2
3
4
5
6
7
8
9
10
11
12
13
14
15
16
17
18
@interface Test ()

@property (nonatomic, assign) NSInteger age;

@end

@impliment Test

- (void)fooDelegate:(NSInteger)theAge
{
_age = theAge;
}

@end

[WMAlert showWithAction:^(NSInteger theAge) {
_age = theAge; //maybe cause retain cycle
}];

3.10 返回BOOL的方法设计和使用时要特别注意

1
2
3
4
5
6
7
8
9
10
11
12
13
14
15
16
17
18
19
20
21
22
23
24
设计一个方法,来表示对象中有没有内容

@interface Foo : NSObject

-(BOOL)isEmpty;

@end

如果判断这个对象是不是“空”很容易写出如下代码

if ([foo isEmpty]) {
//当foo为“空”的时候执行一些动作
}

这种判断方式有个问题,即当foo为nil的时候会存在误判,很明显foo为nil时,该对象在语义上是“空”,但是它不会进入该if分支,因为[nil isEmpty]返回NO.

因此,正确的写法应该是:

if (foo == nil || [foo isEmpty]) {
//当foo为“空”的时候执行一些动作
}

追根溯源还是这种签名设计方式有漏洞,试想OC的NSString并没有一个isEmpty方法,是否是基于这种考虑。

1 autoresizing

1
autoresizingMask:创建视图的同时给出其相对于父视图的“对齐方式与缩放系数”。当父视图发生变化时,通过每个子视图的autoresizingMask即可自动得出新的位置,而无需开发者提供。

缺点:

  • 其描述界面变化规则不够灵活,很多变化规则根本无法精确描述。autoresizingMask缩放比例是UIKit内部计算的,开发者无法指定缩放比例的精确值。

  • 变化规则只能基于父视图与子视图之间,无法建立同级视图或者跨级视图之间的关系。

样例:

1
2
3
4
5
6
7
8
9
10
11
12
13
14
15
16
17
18
19
- (void)viewDidLoad {
[super viewDidLoad];

UIView *containerView = [[UIView alloc] initWithFrame:CGRectMake(0, 0, 320, 200)];
containerView.backgroundColor = [UIColor blueColor];
[self.view addSubview:containerView];

UILabel *text = [[UILabel alloc] initWithFrame:CGRectZero];
text.text = @"1231312";
[containerView addSubview:text];
text.autoresizingMask = UIViewAutoresizingFlexibleLeftMargin | UIViewAutoresizingFlexibleWidth;
text.frame = CGRectMake(0, 0, containerView.bounds.size.width - 20, 100);

dispatch_after(dispatch_time(DISPATCH_TIME_NOW, (int64_t)(2 * NSEC_PER_SEC)), dispatch_get_main_queue(), ^{
containerView.frame = CGRectMake(0, 0, 300, 200);
NSLog(@"%@ %@ %@ %@", @(text.frame.origin.x), @(text.frame.origin.y), @(text.frame.size.width),
@(text.frame.size.height));
});
}

2 autolayout

1
2
3
4
5
6
7
8
9
10
11
12
13
14
15
16
17
18
19
20
21
autolayout:它允许开发者在界面上的任意两个视图之间建立精确的线性变化规则。所谓线性变化就是数学中的一次函数,即:y = m*x + c,其中x和y是界面中任意两个视图的某个布局属性,m为比例系数,c为常量。每个线性变化规则称之为布局约束(Layout Constraint)。
```

### 2.1 NSLayoutConstraint

```objc
NS_CLASS_AVAILABLE_IOS(6_0)
@interface NSLayoutConstraint : NSObject
...
@property (readonly, assign) id firstItem;
@property (readonly) NSLayoutAttribute firstAttribute;
@property (readonly) NSLayoutRelation relation;
@property (readonly, assign) id secondItem;
@property (readonly) NSLayoutAttribute secondAttribute;
@property (readonly) CGFloat multiplier;
@property CGFloat constant;
...
+(instancetype)constraintWithItem:(id)firstItem attribute:(NSLayoutAttribute)firstAttribute
relatedBy:(NSLayoutRelation)relation
toItem:(id)secondItem attribute:(NSLayoutAttribute)secondAttribute
multiplier:(CGFloat)multiplier constant:(CGFloat)constant;

公式:*firstItem.firstAttribute {==,<=,>=} secondItem.secondAttribute * multiplier + constant*

解释:firstItem与secondItem分别是界面中受约束的视图与被参照的视图。他们不一定非得是兄弟关系或者父子关系,只要是他们 有着共同的祖先视图 即可,这一点是autoresizingMask无法做到的。
firstAttribute与secondAttribute分别是firstItem与secondItem的某个布局属性(NSLayoutAttribute)。注意,firstItem与secondItem不一定非得是同样的值, 允许定义诸如某视图的高度等于另一个视图的宽度这样的约束。NSLayoutAttributeNotAnAttribute这个额外解释一下,当我们需要为某个视图精确指定一个宽度或者高度值时,这时候secondItem为nil,secondAttribute为NSLayoutAttributeNotAnAttribute。relation定义了布局关系(NSLayoutRelation)。

1
2
3
4
5
6
7
8
9
10
11
12
13
14
15
16
17
18
19
20
21
22
23
24
25
26
27
28
29
30
31
32
33
34
35
36
37
38
39
40
41
42
43
44
45
46
47
48
49
- (void)viewDidLoad {
[super viewDidLoad];
// Do any additional setup after loading the view, typically from a nib.

UIView *v1 = [UIView new];
v1.backgroundColor = [UIColor blueColor];
v1.translatesAutoresizingMaskIntoConstraints = NO;
[self.view addSubview:v1];


NSLayoutConstraint *topConstraint = [NSLayoutConstraint constraintWithItem:v1
attribute:NSLayoutAttributeTop
relatedBy:NSLayoutRelationEqual
toItem:self.view
attribute:NSLayoutAttributeTop
multiplier:1
constant:0];
NSLayoutConstraint *leftConstraint = [NSLayoutConstraint constraintWithItem:v1
attribute:NSLayoutAttributeLeft
relatedBy:NSLayoutRelationEqual
toItem:self.view
attribute:NSLayoutAttributeLeft
multiplier:1
constant:0];
NSLayoutConstraint *rightConstraint = [NSLayoutConstraint constraintWithItem:v1
attribute:NSLayoutAttributeRight
relatedBy:NSLayoutRelationEqual
toItem:self.view
attribute:NSLayoutAttributeRight
multiplier:1
constant:0];
NSLayoutConstraint *heightConstraint = [NSLayoutConstraint constraintWithItem:v1
attribute:NSLayoutAttributeHeight
relatedBy:NSLayoutRelationEqual
toItem:self.view
attribute:NSLayoutAttributeHeight
multiplier:0.5
constant:0];
// iOS8 以下
// [v1 addConstraint:topConstraint];
// [v1 addConstraint:leftConstraint];
// [v1 addConstraint:rightConstraint];
// [v1 addConstraint:heightConstraint];
// iOS8及以上
topConstraint.active = YES;
leftConstraint.active = YES;
rightConstraint.active = YES;
heightConstraint.active = YES;
}

2.2 VFL

iOS自动布局形式化描述语言。

2.3 自身内容尺寸约束、修改约束、布局动画

1
自身内容尺寸约束:一般来说,要确定一个视图的精确位置,至少需要4个布局约束(以确定水平位置x、垂直位置y、宽度w和高度h)。但是,某些用来展现内容的用户控件,例如文本控件UILabel、按钮UIButton、图片视图UIImageView等,它们具有自身内容尺寸(Intrinsic Content Size),此类用户控件会根据自身内容尺寸添加布局约束。也就是说,如果开发者没有显式给出其宽度或者高度约束,则其自动添加的自身内容约束将会起作用。因此看似“缺失”约束,实际上并非如此。

对于约束的如下几个重要属性:

1
2
3
4
5
6
7
8
9
10
@property (readonly, assign) id firstItem;
@property (readonly) NSLayoutAttribute firstAttribute;
@property (readonly) NSLayoutRelation relation;
@property (readonly, assign) id secondItem;
@property (readonly) NSLayoutAttribute secondAttribute;
@property (readonly) CGFloat multiplier;

/* Unlike the other properties, the constant may be modified after constraint creation. Setting the constant on an existing constraint performs much better than removing the constraint and adding a new one that's just like the old but for having a new constant.
*/
@property CGFloat constant;

更新约束

当使用代码来修改约束时,只能修改约束的常量值constant。一旦创建了约束,其他只读属性都是无法修改的,特别要注意的是比例系数multiplier也是只读的。

添加删除约束

1
2
3
4
5
6
7
8
9
10
11
- (void)keyboardWillShow:(NSNotification *)notification
{
self.labelCenterYNormalCons.active = NO;
self.labelCenterYKeyboardCons.active = YES;
}

- (void)keyboardWillHide:(NSNotification *)notification
{
self.labelCenterYKeyboardCons.active = NO;
self.labelCenterYNormalCons.active = YES;
}

尽量先设置需要将active置为NO的约束,然后再设置需要将active置为YES的约束,如果颠倒上面两条语句的话,可能会引起运行时约束错误。

修改约束优先级

1
2
3
4
5
6
7
8
9
10
11
- (void)keyboardWillShow:(NSNotification *)notification
{
self.labelCenterYNormalCons.priority = UILayoutPriorityDefaultLow;
self.labelCenterYKeyboardCons.priority = UILayoutPriorityDefaultHigh;
}

- (void)keyboardWillHide:(NSNotification *)notification
{
self.labelCenterYKeyboardCons.priority = UILayoutPriorityDefaultLow;
self.labelCenterYNormalCons.priority = UILayoutPriorityDefaultHigh;
}

需要注意的是,只能修改可选约束的优先级,也就是说:

- 不允许将优先级由小于1000的值改为1000
- 不允许将优先级由1000修改为小于1000的值

例如,如果将优先级由250修改为1000,则会抛出异常。

自身内容尺寸约束的抗挤压与抗拉抻效果

弹簧会有自身固有长度,当有外力作用时,弹簧会抵抗外力作用,尽量接近固有长度。

1
2
抗拉抻:当外力拉长弹簧时,弹簧长度大于固有长度,且产生向内收的力阻止外力拉抻,且尽量维持长度接近自身固有长度。 
抗挤压:当外力挤压弹簧时,弹簧长度小于固有长度,且产生向外顶的力阻止外力挤压,且尽量维持长度接近自身固有长度。

对于自身内容尺寸约束,Hug值表示抗拉抻优先级,CompressionResistance值表示抗压缩优先级。Hug值越高越难被拉抻,CompressionResistance值越高越难被压缩。这两个都是针对自身内容尺寸。这两个值越高,在自动布局的时候,view的真实布局就越接近自身内容尺寸。他们表达的是一种自身内容尺寸约束对外加约束的抵抗力。

参考文档:

  1. iOS 8 Auto Layout界面自动布局系列1-自动布局的基本原理
  2. iOS 8 Auto Layout界面自动布局系列2-使用Xcode的Interface Builder添加布局约束
  3. iOS 8 Auto Layout界面自动布局系列3-使用代码添加布局约束
  4. iOS 8 Auto Layout界面自动布局系列4-使用VFL添加布局约束
  5. iOS 8 Auto Layout界面自动布局系列5-自身内容尺寸约束、修改约束、布局动画